Quantcast
Channel: OpenEnergyMonitor
Viewing all 196 articles
Browse latest View live

Setup Emoncms on a RaspberryPI with a Hard drive

$
0
0

After the SD Card write issue setback I've been keen to get an alternative that works for running emoncms locally on a raspberrypi. I now have my home monitoring setup running off a raspberrypi with a hard drive (as recommended by Paul Reed, thanks Paul!) and a pihub as in the picture above and I've uploaded an image and details of this option to the emoncms.org documentation here:

http://emoncms.org/site/docs/raspberrypihdd

I think there are quite a few benefits to running emoncms locally especially as we start to add the ability to control things from emoncms in addition to monitoring. Being able to set a heating profile shouldn’t depend on a working internet connection or a remote server's uptime. Control needs to be as robust and secure as possible.

I also think there is an important benefit of improved privacy: Energy, temperature and other environmental data is often sensitive personal data. Storing data locally is probably the best way to ensure you have full control over the privacy of your data as it never needs to leave the home unless that is you decide to share certain feeds for an open dataset or enable remote access for access while away or on the move.

Another benefit that I make regular use of is to develop new features such as the recent open source building energy modelling work (see application guide), because my data and the application was local I could edit the visualisations and model and see the results on my data straight away.

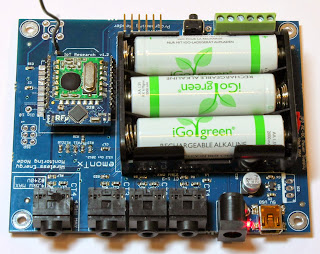
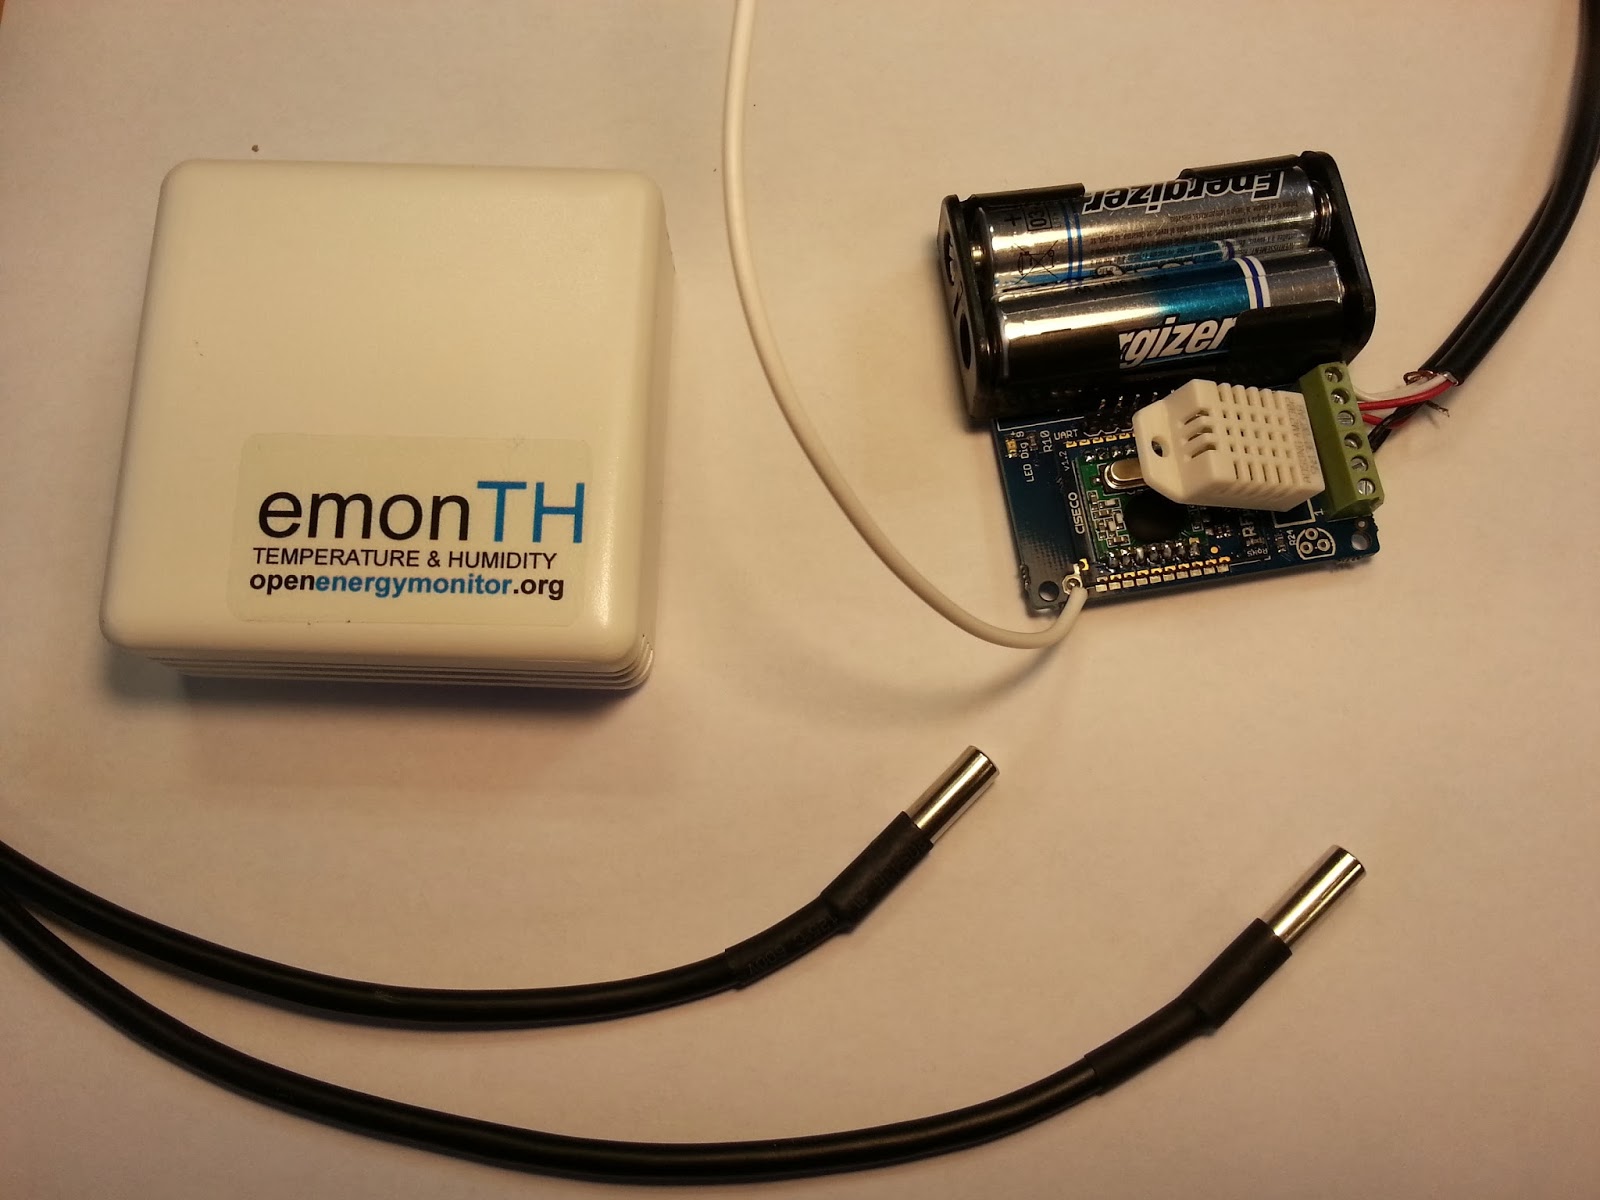
The emoncms raspberrypi hard drive image comes with quite a few add-on emoncms modules installed out of the box including the Event and MQTT module by Nick Boyle (elyobelyob). I tested the NMA notify my android feature and it worked great.

Here are all the add-on modules installed out of the box:
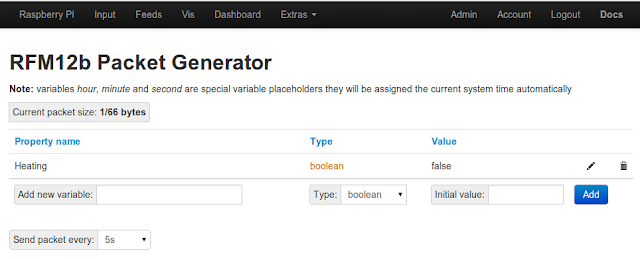
  • PacketGen, A new module for sending control packets.
  • Event module for sending Prowl, NMA, Curl, Twitter and Email notifications.
  • MQTT module for subscribing to MQTT topics containing data to be logged to emoncms.
  • Notify module sends an email if feeds become inactive
  • Energy module. Create a David MacKay style energy stack
  • OpenBEM module. Open Source Building Energy Model. Investigate the thermal performance of buildings.
  • Report module. Create's electricity use reports including appliance list exercise
There are two images in the zip attached in the documentation, one is called boot.img and the other pi_hdd_stack.img.

The boot.img goes on the SD card and just tells the PI to use the filesystem that is on the external harddrive. The second image pi_hdd_stack.img needs to be written to the hard drive.

With the harddrive connected to the PI through a powered hub and the boot SD card inserted in the PI, the pi should just boot-up and and be ready to use.

emonTx V3 AC Adapter Socket Error

$
0
0
Just quick post to highlight a small bug in the first batch of emonTx V3...there had to be something!

The barrel-jack socket on the first batch of emonTx V3's has got a middle pin with a diameter of 2.5mm. Our adapters don't fit since they are 2.1mm..Doh! 

To solve this we're shipping a little adapter unit with each emonTx V3:


The AC-AC adapter is important and very useful on the emonTx V3 since it can power the unit as well as simultaneously providing an AC voltage sample for IRMS and Real Power readings.

It's been a busy day of order fulfilment today, all emonTx V3, emonTH and emonTx Shield SMT pre-orders will be shipped by tomorrow. Sorry for the slight delay, waiting for these adapter units to arrive was the cause for the delay. Hopefully the orders should all arrive at the destinations before Christmas. 

Onwards! We're working hard to keep shipping out right up until Christmas. See my last post  last postage does for guaranteed delivery before Christmas. 

emonTx Family Tree

$
0
0
Now that the new emonTx V3 has been launched in the shop, all pre-orders have been shipped and documentation for the new units is slowly coming together this feels like a good time to take stock of where we've come from in the last couple of years.

It's been interesting this evening to look back through old photos. Here's a few photos of us etching our first emonTx PCB ourselves using a laser printed transfer and horrible acid, not recommended! 

Etching the first emonTx V0.1 in Jan 2011

First emonTx V0.1 prototype in Jan 2011
Needless to say they results were not great. Still, a fun experience.

emonTx V1 - May 2011
In 2011 we got our first emonTx V1 PCB manufactured, see introduction blog post. Only a few (about 10 in fact) of V1's were made, we sent most of them out for free to friends and developers. If you have one, it's a rare piece of hardware! We quickly moved to V2, tweaking a few things. The design did not really change huge amount to the V2.2 design which we're still selling in the shop.


emonTx V2 - March 2012
The emonTx V2.2 design which has been the backbone of the project for the last year and a half, in that time we've sold almost 5000 of these! They have been shipped all over the word from Hawaii to Korea and most places in between! 

emonTx SMT prototype V? - Aug 2012

In the summer of 2012 we worked on an emonTx SMT prototype, we threw all bells and whistles into this basing the design on an Atmel energy monitoring app note. This design was based on the ATmega32U4 and would be very accurate with adjustable gain pre-amps on the CT channels. However after building a first prototype (which worked!) we realised that the price of this unit would probably be more than most would be willing to part with for an energy monitor. Keeping in mind that a web-connected base station and LCD display would probably also be desired for a full monitoring system. We also realised that for our first intro into SMT manufacture this design with it's very extensive BOM was perhaps a little ambitious.

The first emonTx SMT design was shelved (at least for the time being) and we put our efforts into designing a simpler more streamline unit with performance on par with the emonTx V2 which is good enough for most energy monitoring applications. Here was born the emonTx V3:

emonTx V3 - Dec 2013

The emonTx V3 was designed to be easily SMT manufactured, fit nicely into a tidy wall mountable enclosure, be flexible in terms of RF and MCU and have some useful additional features such as the ability to power the unit from a single AC power adapter which also provides an AC signal for Real Power and Irms calculations.

emonTx V3 SMT pre-assembled

The finished emonTx V3 unit

Feeling like a proud parent as the first emonTx V3 is shipped...while also rocking a Movember!

We're proud of where we have got to, however (as always!) there is still much work to do. Hardware wise we plan to make the emonGLCD pre-assembled SMT and (hopefully) reduce its cost in 2014 and also dip our toes into control of appliances as well as making system setup as easy as possible. 

Thanks for your continued support along this journey. We would not have achieved half as has much if we were not standing on the shoulders of many other open-source projects and community contributions. 

Emoncms (early) Heating Control Demo

$
0
0
I've just hooked up a relay to control my central heating boiler and am successfully controlling it via the new emoncms packet generator module...it feels like the future has arrived in my house :-)

The next step will be to make a nice user facing interface which allows setting heating control time schedules and pulling in temperature data from emonTH and even making it smart by using energy data to try and detect if someone is home or not. Lots of exciting possibilities now the enabling hardware is in place.

Gas Combi Boiler Relay Control Unit top left
Please excuse the old boiler, yes I know it should be a no brainer to replace it with a modern efficient condensing unit however things are never simple in rented accommodation. In practice I hardly use the boiler since bottled LPG is very expensive (no mains gas available here), luckily I have a wood stove and a good supply of wood!

Here's a demo of the heating boiler being turned on remotely:


Hardware:

Webserver: 
Raspberry Pi with RFM12Pi expansion module running emoncms (on external HDD file system): see blog post. The Raspberry Pi and emoncms are also used to log my home power consumption from my emonTx V3, and room temperatures and humidity from my emonTH's. It also mirrors the data to a remote emoncms server for backup.

Raspberry Pi with RFM12Pi module with emoncms running locally on HDD file system


Control Node:

If switching mains voltage is involved only undertake tasks you are comfortable with, making sure everything is isolated before starting work and don't take any chances. 

Heating systems vary widely, as does the type of control available. Some heating boilers can be controlled via an RF protocol, this could be preferable since tapping into the boiler direct and switching high voltage would not be required.

My old Worcester Bosch 240 with Honeywell controller requires connecting two terminals together to switch the heating on (see image below). I managed to wire in an additional control wire while keeping the original timer unit in place.

I used an emonTx V2 with JeeLabs relay module, this is just what I had to hand, any RFM12B node with an appropriate relay module could be used. We're looking into making a prototype PCB with an RFM12B, relay unit, on-board power supply and in-line energy monitoring (why not?!). The important consideration here is to make sure everything is properly enclosed and wired up to a high standard if you're controlling mains voltage. DON'T TAKE CHANCES WITH MAINS VOLTAGE.

It's important that the relay module used can handle the current being switched in my case this was only about 500mA @ 240V AC but if you're controlling an electric heating direct this is an important consideration.

Old Honeywell timer controller unit with front face removed - connect terminal 5 to 3 to turn heating on - black wire goes to relay (caution 240V AC)

emonTx V2 with RFM12B and JeeLabs relay module


Software:

Emoncms Raspberry Pi Server
emoncms running on Raspberry Pi with the new packet generator module, see blog post. This is included in the emoncms Raspberry Pi external HDD image (it's still in beta). For the moment as shown in the video the relay is switched on and off from the emoncms backend web page by browsing to the Pi's local IP address and logging into emoncms and selecting the packet gen module under the extras menu.

emoncms RFM12B control packet generator module - beta

To enable control from outside the house the the http port would have to be opened on my router's firewall and a dynamic dns setup on the external IP address. As mentioned at the beginning of this post the next stage is to design a user facing interface dashboard for emoncms control modules.

Arduino Firmware: 
I've pushed the Arduino sketch running on the emonTx to the emoncms packetgen module GitHub as an example.

Fail safe
I choose a non latching relay so in case of control unit power failure the relay will default to the open / off position.

I've tried to make the code on the relay control unit as fail safe as possible (independent of Raspberry Pi and network) and as boiler friendly as possible by including a fail safe time after which the relay will default to off (1hr - I'm a frugal user of heating), and a maximum switching rate of 5 min to stop the boiler repeatedly being switched on and off should something go wrong. A hardware watchdog on the ATmega328 was included to try and ensure the microprocessor never locks up.


Emoncms control developments and demo's

$
0
0
First Happy Christmas everyone for yesterday!

One of the things I enjoy about the Christmas period is that you get some nice time to relax and with relaxation comes ideas and energy to try out some new things.

Glyn and I had been talking about control interfaces that could work well on a mobile or tablet and Id been working on a touch enabled dial earlier this month so I thought Id package it up as a emoncms module that sets the control variables in the packetgen module, I've also created a couple of simpler control interface examples using buttons and edit boxes. To try out the following demo's for yourself see the steps at the bottom of the post.

Example 1: Heating On/Off

A simple example using a bootstrap styled html button as our heating on/off button. Clicking the button toggles the state and updates the “packetgen” control packet with the new state.

button off

button on

Example 2: Heating On/Off plus set point

Very similar to the first example but now with a text input for setting the set point temperature for the room/building. The microcontroller on the control node checks the room temperature and turns on and off the heater depending on the setpoint setting it recieves from emoncms.

setpoint

Example 3: Nest inspired dial

A nest inspired dial interface for setting the setpoint temperature. The set point can be adjusted by spinning the dial wheel with your finger:

heating dial

The dial and page resizes to fit different screen types from widescreen laptop's to mobile phones and tablets and touch can be used to spin the dial.

heating dial mobile

Solar PV Generation

Not really control but developing the idea of custom html/javascript canvas based graphics further.

I've always liked the standard “news & weather” app that came with my android phone. It's a good example of how clean an intuitive graphs can be and how touch can be used to browse temperature/humidity at different times of the day.
This example is a start on creating a graph that looks and behaves in much the same way implemented in canvas.

solarpv

What you will need to run these examples

You will need your own installation of emoncms to try these out, such as an emoncms + raspberrypi + harddrive setup.

RaspberryPI with harddrive

You will also need the packetgen module (installed as default with the harddrive image):

http://github.com/emoncms/packetgen

and the 'development' repository

http://github.com/emoncms/development

Copy the folder titled myheating from the development repository to your emoncms/Modules folder. (from development/Modules/control)

You should now be able to load the examples by clicking on the My Heating menu item.

The example does not yet allow for any gui based configuration and so assumes that the control packet structure looks like this:

packet structure

This packet will work with the Arduino electricradiator control node example that can be found here:

Arduino Examples / electricradiator

This sketch could be run on an emontx with jeeplug relay's attached or other rfm12b + arduino + relay type hardware builds.

Coding your own control interface

The code for the simple button example above which may be useful as a foundation for building something else can be found here:

https://github.com/emoncms/development/blob/master/Modules/control/myheating/button.php

The interface is all in html and javascript jquery and uses bootstrap style buttons it just sends the updated heating state to the packetgen module via ajax.

More posts on controlling things

Glyn's post on controlling his boiler: http://openenergymonitor.blogspot.co.uk/2013/12/emoncms-early-heating-control-demo.html

The packet generator: http://openenergymonitor.blogspot.co.uk/2013/11/adding-control-to-emoncms-rfm12b-packet.html

Developing for Arduino remotely on a Raspberry Pi

$
0
0
I found myself tonight requiring the ability to develop for Arduino remotely on a Raspberry Pi. The use case is connecting an Arduino Uno to a Raspberry Pi to receive data from my Bee Hive Temperature Monitor setup. The Arduino posts data received from the Bee Monitor as a serial string onto ttyUSB0, EmoncmsPythonLink script is used to post the data to the emoncms server running locally on the Raspberry Pi with the file system on an external hard drive. The Pi also has an RFM12Pi fitted receiving data from an emonTx and a couple of emonTH's

I wanted to be able to access the Arduino, and upload a new sketch to fix bugs etc remotely since I will not always have local access to the system.

I came across a great Arduino command line build environment called inotool

http://inotool.org/


$ sudo apt-get update 
$ sudo apt-get install arduino
$ sudo apt-get install python-dev&&python-setuptools
$ git clone git://github.com/amperka/ino.git
$ sudo python setup.py install

if you want to use ino's built in serial terminal

$ sudo apt-get install picocom

to exit picocom serial [CTRL + A] followed by [CTRL + X]

$ ino init -t blink      # initiates a project using "blink" as a template, copy libraries into 
$ ino build               # compiles the sketch, creating .hex file (default Arduino uno -m atmega328 for duemilanove)
$ ino upload             # uploads the .hex file

The setup works well, opening the port on the router I can now ssh into the Pi and upload new sketches to the Arduino from anywhere on the web,

Tutorial on how to create an emoncms module

We Won! Daily Post Business Award 2013 - Green Award Category

$
0
0


We have been lucky enough to be awarded winner of the Green Award category in the Daily Post Business Awards 2013. The Daily Post is a regional (North West Wales) newspaper, the Green Award was sponsored this year by Windpower Wales. The award was announced at the end of last year, I resisted posting about it until we got our hands on the video that was made about us.

Winning the award was very unexpected for us, we feel very humbled. It goes without saying that it would not be possible for us to be doing what we do if it was not for the work of many others. As always with open-source it feels like we are standing on the shoulders of lots of other projects. A big thank you to everyone who has contributed to the project in some way and or bought items from the shop.

Given the nature of an online collaborative project such as OpenEnergyMonitor much of our day-to-day communications and business is conducted online; it's great that what we are doing is being recognised locally. Trystan and I are very proud to be able to live and work in Snowdonia, North Wales. We're both welsh speakers and were brought up locally. Our website http://megni.co.uk has a couple of photos I've taken while out climbing and walking in the Snowdonia mountains as well as an overview of the OpenEnergyMonitor system.

Megni (which means 'monitoring energy' in Welsh) is the name of our business which runs the OpenEnergyMonitor shop. We're keen to make the distinction between Megni and OpenEnergyMonitor since we don't take claim for all OpenEnergyMonitor developments: the .org website, open-source hardware, software and documentation is all separate from the business. Megni is a partnership between Trystan Lea and myself (Glyn Hudson); we now have a couple of friends Ynyr Edwards and Gwil Noble working with us helping with shop fulfillment, support requests and ongoing development.

This award ended 2013 on a high for us, it's been a very exciting few months launching new pre-assembled hardware units and moving into a new office / lab space. Let's hope 2014 is just as awesome! We have lots of exciting plans for this year, high on the list is starting to move into the control of appliances and general polishing of the energy monitoring system.

Here's a short video which was made for the event, it's got some nice shots of the hardware and our new lab:


emonTH Multiple DS18B20 Sensors

$
0
0
Thanks to Dave McCraw it's now possible to connect multiple DS18B20 digital temperature sensors to the emonTH on the one-wire bus.

Two External DS18B20 temperature sensor + internal DHT22 temp + humidity on emonTH

Multiple DS18B20 sensors can be (optionally) used alongside an internal DHT22 temperature and humidity sensor. Dave's sketch which is now up in the emonTH GitHub repo supports two DS18B20 sensors but can easily be extended to include more.

Dave's multiple sensor sketch requires the unique hardware addresses of the DS18B20 sensors hard-coded in the sketch, the 'emonTH temperature search' utility sketch can be used to discover the addresses.  Hardcoding the hardware addresses guarantees Emoncms inputs won't flip around if you replace or add sensors.

The multiple DS18B20 sketch includes all the low power saving tricks, the sensors are only switch on when required and the ATMega328 goes to sleep in-between readings switching off all unnecessary functions. Obviously running more than one sensor will consume more power but I would still expect battery life to be in the region of 12 months.

Using multiple DS18B20 external temperature sensors on the emonTH as lots of exciting possibilities, a few ideas include:


emonTH main getting started page: http://openenergymonitor.org/emon/modules/emonTH


OEM Gateway: Serial Port > Emoncms Link

$
0
0
In the past we have recommended our simple EmoncmsPythonLink to post data to emoncms which is received on a serial port (this could be an Arduino or USB device such a JeeLink plugged into a Raspberry Pi).

The OEM Gateway by Jerome that we use extensively on the Raspberrry Pi to post data received by the RFM12Pi to emoncms can also (easily) be used to post data received an a serial port to emoncms. Using the OEM Gateay to do this rather than the Emoncms Python Link is a much more robust solution with better error logging.

I have recently setup a Raspberry Pi with an Arduino connected to receive RF data from my honey bee hive temperature monitor and post to emoncms. I found using the OEM gateway in conjunction with ino to compile and upload code for the Arduino remotely over ssh directly on the Raspberry Pi to be invaluable for remote bug fixing.

Here's how to use the OEM Gateway to post data to a local or remote emoncms from data received on a serial port:

1. Fist setup the Arduino / JeeLink  to write to the serial port using Serial.print() in the following format 

NodeID val1 val2
NodeID val1 val2

Example for temperature and relative humidity fluctuating around 19°C and 60% posting as node 11

11 19.2 60.1
11 19.5 60.0
11 19.3 60.4
(No restriction on number size and decimal part.)

2. Follow the excellent instruction on Jerome's Github for how to setup the OEM gateway 

https://github.com/Jerome-github/oem_gateway


3. Rename the oemgateway.conf file and edit it as follows adding in your USB port and API keys for local or remote emoncms or both.

####################
# Gateway settings #
####################
[gateway]
# loglevel must be one of DEBUG, INFO, WARNING, ERROR, and CRITICAL
# see here : http://docs.python.org/2/library/logging.html
loglevel = DEBUG

#############
# Listeners #
#############
[listeners]

# This listener manages the serail
[[Serial]]
    type = OemGatewaySerialListener
    [[[init_settings]]]
        com_port = /dev/ttyUSB0
    [[[runtime_settings]]]

###########
# Buffers #
###########
[buffers]

# The two following buffers instantiate the same class, 
# that formats the data for an emoncms instance.
# One sends the data to a local instance, the other one
# to a distant one.
# If active is set to False, the buffer neither records nor sends any data,
# but it holds unsent data until active becomes True.
[[emoncms_local]]
    type = OemGatewayEmoncmsBuffer
    [[[init_settings]]]
    [[[runtime_settings]]]
        domain = localhost
        apikey =xxxxxxxxxxxxxxxxxxxxxxxxxxxxxxxxxxxxxx
        protocol = http://
        active = False
        path = /emoncms

[[emoncms_remote]]
    type = OemGatewayEmoncmsBuffer
    [[[init_settings]]]
    [[[runtime_settings]]]
        domain = emoncms.org
        apikey = xxxxxxxxxxxxxxxxxxxxxxxxxxxxxxxxxxxxxx
        protocol = http://
        active = True
        path = 


4. Start the gateway with instruction to use the config from the config file 

$ ./oemgateway --config-file oemgateway.conf


The instructions on Jerome's Github can be followed to set the oemgateway script to run as a deamon service automatically at startup if required.

Pebble Smart Watch Emoncms Display & Heating Control - Dev

$
0
0
Smart watches seem to be all the rave at the moment. They could potentially be a convenient way to check your power and temperature feeds, be notified of events and control your heating.

Our friend Ryan Brooks (@spikeheap) has been working on getting Emoncms feeds to display on his Pebble Smart watch as well as making the fist steps towards controlling his RaspberryPi controlled heating from his wrist.

Take it away Ryan>


Ryan's code it all on GitHub if anyone fancies joining the fun. It would be great to get an Emoncms app in the in new Pebble app store. Even if it is just a simple as being able to display a single Emoncms feed this would be pretty cool.

https://github.com/spikeheap/pebble-emoncms

We've made the local newspaper!

$
0
0
After receiving the Achievement Wales Daily Post Green Award we recently got interviewed for the Daily Post newspaper. The resulting article gives a bit of background about how we started out complete with a nice 'cheesy' photo!

Here's the article:


Emoncms developments and calculating wh totals on the emontx

Direct connection emonTx V3 > Raspberry Pi GPIO

$
0
0
Sometimes it's more convenient to connect the emonTx V3 directly to a Raspberry Pi base station rather than use RF. 
Both the Raspberry Pi and emonTx V3 run at 3.3V so the serial Rx and Tx serial lines can be directly connected. The raspberrypi's 5V supply can be used to power the emontx which is then stepped down to to 3.3V through the emonTx V3's voltage regulator. 5V is provided by the red wire. The ground connection is the black wire and the data going from the emontx to the raspberrypi is the green wire. I haven't connected a wire for serial data going the other way but this is a possible option if two-way serial is required.

emonTx V3 > Raspberry Pi Connection 


Here's a simple direct serial output sketch for the emontx v3 on GitHub here
On the raspberrypi if you just want to forward the emontx data to a remote emoncms this can be done with the oem_gateway developed by Jerome which is on the standard rock solid forwarder image
See our blog post about how to configure the oem_gateway for work over a serial link rather than RFM12B 

This info was taken from the emonTx wiki and written up after a forum thread

For the future we are working on developing an energy monitoring shield for the Pi to create an all-in-on Pi-energy-monitoring unit, see dev forum thread: http://openenergymonitor.org/emon/node/3937

emonTx V3 Antenna Testing

$
0
0
Today we did some quick testing regarding using different antennas with the emonTx V3. 

Four antenna options were tested (Farnell part numbers listed for SMA antennas) :


Note: the graph sub-title has a typo, it should read 'RFM69CW', 'CRW' module does not exist.. At least to my knowledge! 

It was found that the wire-whip antenna as shipped by default with the emonTx V3 performed best. 

However using an SMA could be preferable in some environments; it's more robust and can  be extended easier. 

Now we have a way to measure RSSI (received signel strength indicator) using  an rfm69cw module we plan  to  do some more antenna and range testing. I'm interested to test to see how many db we're loosing in the antenna pcb trace from the module to the RFu328 then the emonTx V3 pcb trace then finally into the 90 degree sma connector. In future version will probably but the rf module and MCU directly on the PCB keeping the antenna trace as short as possible and use an edge mounted sma connector (these are also cheaper and easier to solder in manufacture). 

For more info on the test see the emonTx V3 wiki page:  


Elektrocamp, visiting Jerome in Bordeaux and OuiShare

$
0
0


Lars Zimmerman and Jenni Ottilie Keppler (Open It Agency), Tristan Copley Smith & Jonathan Minchin (Open Source Beehives), Nick Ierodiaconou (Open Desk), Justina Swat (Fab Jam), Tomas Diez (Fab Lab Barcelona) and Open Energy Monitor (myself) at OuiShare Paris.

Im now back home in Wales after spending two weeks in France and Belgium attending two interesting events and meeting up with Jerome Lafréchoux developer of the oem_gateway (now emonhub) in Bordeaux. It was a great two weeks, I met lots of very nice people and heard about all sorts of interesting projects.

The first event was Elektrocamp which is a European meetup that happens every 6 months for people taking an open source approach to Smart Metering, Smart Home, Smart Grid. Some of the projects at elektrocamp where:

Flukso– an innovative open source energy monitoring project using openwrt
OpenTRV– open trv heating controller
Perpetual project– better heating control methods and algorithms
MySmartGrid - open smart grid approaches based on flukso

I then went down to Bordeaux to meet Jerome Lafréchoux who developed the oem_gateway which is a central part of the OpenEnergyMonitor system, it was great to meet in person and discuss next steps for OpenEnergyMonitor and emonhub development as well as enjoying a beer and good food.

Then it was back up to Paris for OuiShare which is an amazing event bringing people together from quite a wide spectrum of projects in the sharing/collaborative economy. There was a good group of us open hardware people there, we had our own space called 'the factory' where as well as a lot of discussing we built things, I spent quite a bit of time over those days building open source furniture with Nick of OpenDesk and beehives with Tristan and Jonathan of open source beehives.


Lars Zimmerman of Openit made a good blog post with a list of many of the open hardware projects at OuiShare here http://openitagency.eu/open-source-hardware-ouisharefest
Here's a copy of the list and I've added a few more on the bottom:
Thanks a lot to Leo Benichou for organising the open hardware for energy transition session at ouishare and for putting me up for the days in paris.
As Lars said, Good days for Open Source Hardware!

ZeroCarbonBritain: Report in short

$
0
0
I've just come across the 'report in short' flyer by zerocarbonbritian giving a very nice overview of their more in-depth report that I've mentioned before that outlines a very positive and thorough vision for a sustainable future. If you haven’t seen it already its worth checking out:

"We have the technology to power ourselves with 100% renewable energy, to feed ourselves sustainably and to leave a safe and habitable climate for our children and future generations" - ZeroCarbonBritain


Download the flyer here: ZCB_RTF - Report in Short - A4 printable.pdf

Download the full report here: http://zerocarbonbritain.com/

Id also very much recommend Alice of ZeroCarbonBritain's inspiring talk on their work:

 
Alice Hooker-Stroud, Centre for Alternative Technology, ‘Zero Carbon Britain (Energy)’ from tyndallcentre on Vimeo.

Development update: EmonHub, Emoncms&MQTT, Application guides

$
0
0
There's been a lot of development happening recently but not being blogged about so here's a short overview with links to where to find out more:

EmonHub (The next version of the oem_gateway)
http://openenergymonitor.org/emon/node/5203
Paul (pb66), Jerome, Dave McCraw and I have been discussing the best way to integrate the ability to listen and dispatch data with different datatypes and how best to integrate threading so that dispatchers cant block the other dispatchers and listeners.


Using MQTT with Emoncms to make a more extensible flexible system.
We've discussed the idea of using MQTT within emoncms several times before but the idea came up again during discussion about the best way to implement node decoding in emonhub. Emoncms could provide some of the same features of emonhub ie multiple listeners and multiple dispatchers in an elegant way if it incorporated mqtt message queues. It would also provide benefits for control as initially explored here last December https://github.com/emoncms/development/tree/master/experimental/control/nodejs_websocket_thermostat

Here's a system diagram of how it could look like:


This approach needs a fair bit of work to make it a really nice solution, If you think this is the way to go it would be great to get some help with making it happen, in particular:
  • Integrating the event module by running it as its own process subscribed to the applicable mqtt topics.
  • Writing a process for the emonhub style dispatcher for sending data to other services such as a remote emoncms or another service entirely such as PVOutput or ThingSpeak
  • Creating raspberrypi module style emoncms gui for the new python based listener setting the rfm12pi radio settings.
  • Managing all these processes, a process status interface in emoncms?
Richard Hatfield and I have also been doing work on setting up Emoncms + MQTT + scheduler for heating control, the raspberrypi software setup guide for the configuration so far is here:
https://github.com/openenergymonitor/documentation/blob/master/Modules/RaspberryPI/FullStackHDDScheduler/FullStackHDDScheduler.md

There are also some new related MQTT mini examples in the emoncms/development repository: https://github.com/emoncms/development

I've created a forum thread for discussing emoncms + mqtt here:
http://openenergymonitor.org/emon/node/5207

New Application Guides


An ongoing project for some time now is the writing of new application guides that go through step by step system building for home energy monitoring, heatpump monitoring, solar pv and thermal performance monitoring, integrating some of the new features for counting watt-hours on the emontx and using some of the new emoncms features such as myelectric. There's a new github repository in which to develop these guides. The table of content so far is:


Help with testing and github pull requests with changes to these guides would be most appreciated and if youd like to submit a guide for an application or configuration that you dont think has been covered well that would also be welcome. Please get in touch on the forums if you've got any question's about development and how to get involved.

Emoncms Mobile View (My Electric)

$
0
0
The latest version of Emoncms (V8) has got a feature called 'My Electric', this is a ready made mobile friendly dashboard.

Just click the 'My Electric' button once logged into Emoncms and select your Power and Kwh/d feeds. You will notice that that URL for this page automatically contains your read-only API key, this is to enable this page to be bookmarked and easily accessed on a mobile device.

If you use Chrome on both your desktop and mobile device your bookmarks will automatically sync. For even easier access Chrome on Android allows web-pages to be pinned to the home screen for one button full screen access, this makes the Emoncms page load almost instantly, just like a native app giving a real-time dynamic view of how much power is currently being consumed or generated. Just follow the steps below:

On first visit the My Electric page will ask you to select your Power and KWh/d feeds

To create a shortcut on your Android home screen hit the 'Add to home screen' button in Chrome

A shortcut is now created on your homescreen to enable quickly firing up the dashboard

When the homescreen short-cut is launched the My Electric dynamic mobile view page loads up almost instantly in Chrome in fullscreen mode (no URL bar etc.). This makes  it appear like a native app
Recently Trystan has been working on taking the first steps to building a native Android Emoncms app documenting the progress of building Android apps as he goes along. If your an Android developer who fancies working on this, please get in touch. See here for Trystans progress:

https://github.com/openenergymonitor/documentation/blob/master/BuildingBlocks/AndroidApp/AndroidAppPart1.md 

https://github.com/emoncms/AndroidAppDev/tree/master/HelloWorld

Emoncms 'Hello World' Android App


Hardware Developments - Update

Viewing all 196 articles
Browse latest View live